
Introduction to iron-manganate titrations
This iron-manganate titration is widely used, most frequently to determine how much iron a substance contains. Common examples where this might be used are:
a) Finding the quantity of iron in a pharmaceutical iron tablet, which often contain compounds like iron (II) sulphate.
b) Finding the % of the mass of a compound which is due to the element iron.
c). Estimating the amount of iron in a natural material, such as leaves, vegetables etc.
The procedure to carry out an iron-manganate titration illustrates many important aspects of titration procedures and so is a good starting point for understanding this technique in more detail. In many ways, an iron-manganate titration is actually easier to understand than an acid-base titration, even though these are often studied first by students. Furthermore, it is much easier to develop a picture of what is happening at a particle level than acid-base titrations with indicators. We can appreciate these titration specific aspects without having to get bogged down in the details of the redox reaction involved (which will be covered in a later section).
Overview of the method
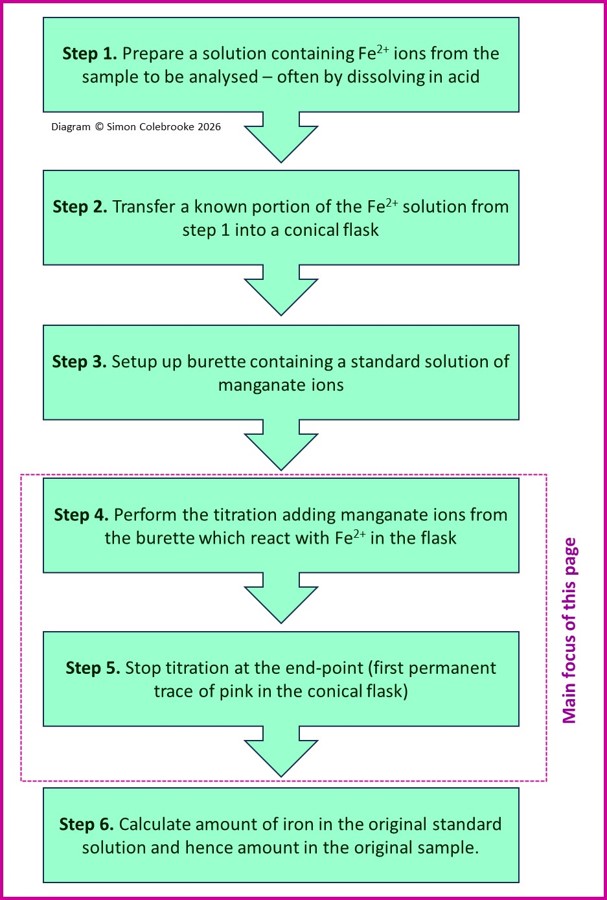
The overall procedure for an iron-manganate titration can be imagined as a number of different stages, organised according to the flow diagram below. The parts for this page are the titration itself (steps 4 and 5) although a quick description of all the others is also useful.
The most important aspects of this titration are:
Step 1: The exact nature this step will depend upon the specific sample being analysed, including how much of it is available and so on. The key point is, that the sample is dissolved in acid, which either converts any elemental iron present into Fe2+ ions or removes existing Fe2+ ions from an ionic lattice into solution. The solution is then transferred to a volumetric flask, which is subsequently filled to the graduation line. The concentration of this analyte solution is not known (the whole aim of the experiment is to find out how much iron is there!), but crucially, the relationship between the volume of this solution and the mass of the original sample is precisely known.
With so many different types of sample to analyse step 1 can be rather varied in terms of the amount of acid used / the volume of solution prepare / mass of sample taken etc. We just have to reason out what the link is between the original solid sample and the total volume of solution prepared and use that relation to calculate anything else we need later.
Step 2: A certain portion of this analyte solution is then taken (using a volumetric pipette) and transferred to a conical flask ready for the titration itself. The actual amount will have to be chosen so that the final titre is of a suitable size (a titre of around 25.00 cm3 is ideal) so that the percentage uncertainty is not too large. We also need to take a small enough portion of the analyte solution so that the titration can be repeated multiple times to achieve concordance. Again, like step 1, this can vary quite a lot from one specific example to another.
Together these first two steps can make the procedure look confusing; they may be different to what you have done before, so it is important to remember that they are just setting up the titration in a way where we will be able to track back to the sample we are trying to analyse.
Although the details of these first steps can vary, the rest of the titration proceeds in a very reproducible way, whatever the specifics of the sample being analysed. The setup is usually as shown in the diagram below:
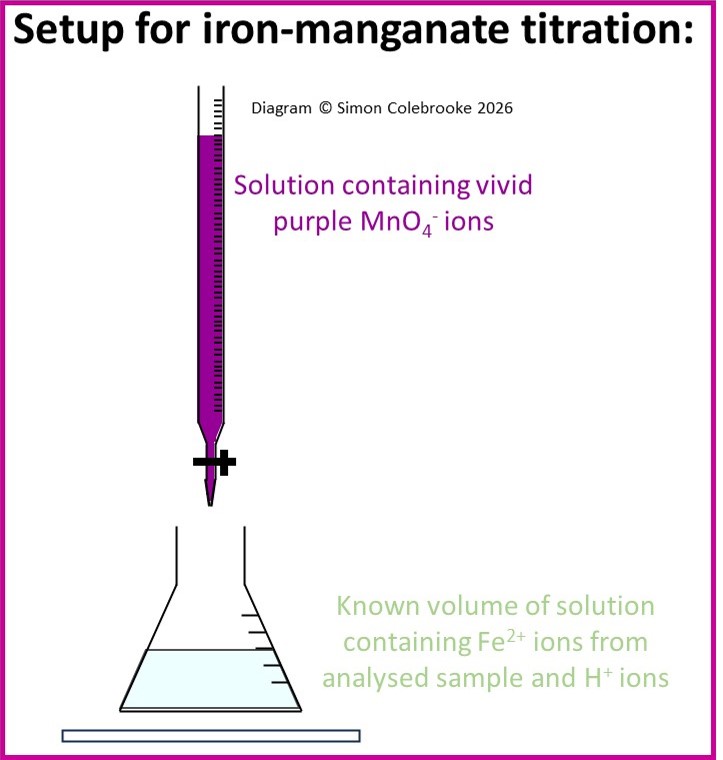
Step 3: The burette is prepared as described previously, with a standard solution of known concentration of manganate ions. This is usually a solution of potassium manganate (VII), KMnO4, with some sulphuric acid added to it (“acidified potassium manganate (VII)”).
Steps 4 and 5: The titration is now carried out and the volume of manganate solution required to react with the Fe2+ ions is measured. The end-point is taken as the first sign of a permanent pink colour in the conical flask, which is explained further below. Given the intense colour of the manganate ions in the burette it may be necessary to read from the top of the meniscus rather than the bottom for this titration.
Step 6: Finally, a calculation starting with the titre of the manganate solution is carried out to determine the amount of Fe2+ in the conical flask and subsequently the amount of Fe2+ in the original sample.
Reaction in the iron-manganate titration
The ionic equation for the reaction involved in the titration (which occurs in the conical flask) is:
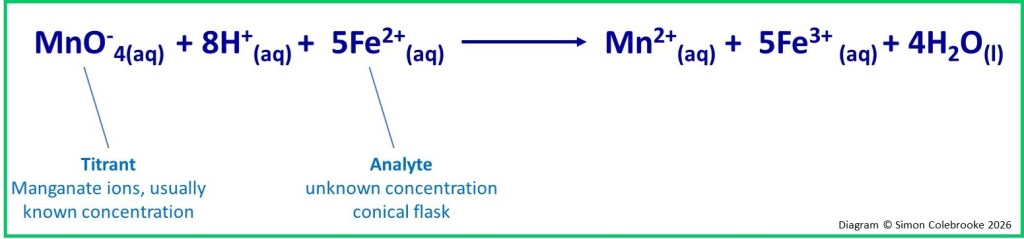
The most important aspect is that manganate ions (MnO4–) react with Fe2+ ions. Notice the 5:1 stoichiometry. The H+ ions are required for the reaction to occur and are usually present anyway because the iron containing substance is dissolved in acid, although some additional aqueous acid can be added if required. If the solution is not acidic enough the MnO4– ions can be converted into MnO2 rather than Mn2+, giving a brown colour to the solution and making the end point harder to determine. The H+ ions are present in excess and won’t play any significant further part in the discussion of this titration, but the choice of acid will be discussed further in future pages on redox.
**Note that this is an ionic equation and only shows ions involved in the titration reaction itself. The manganate solution contains potassium ions which are also present in the flask but do not react – they are spectator ions. In addition, the acid contributes sulphate ions and there may be other anions originating in the sample being analysed. This is a common source of confusion for students – they read that “potassium manganate solution” is used, but see no sign of potassium in the equation. So it is really important to remember what reaction is actually involved in the titration and do not get distracted by spectator ions which are not shown.
Self-indicating titration
No indicator is needed for this titration as the colour of the MnO4– ions is so vivid that it can be used to identify when equivalence has been obtained. To understand why, it is necessary to think about the colours of all the ions present in this titration, as summarised in the table below:
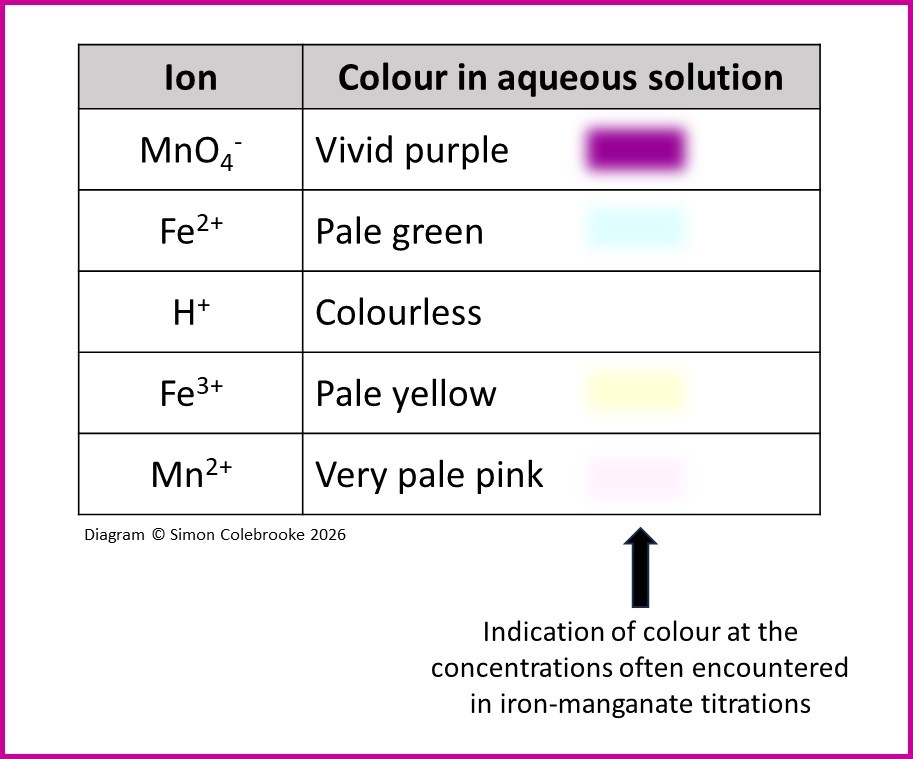
It can be seen that only the MnO4– ions exhibit an intense colour and their colour dominates any solution in which they are present. They are far more vividly coloured than any of the other ions present amongst the reactants or products of the reaction.
How the titration works:
To begin the titration the deep purple solution of manganate ions fills the burette whilst the conical flask contains the very pale solution of Fe2+ ions. When the titration begins and manganate ions are added to the flask there is an immediate reaction between them and the Fe2+ ions. This forms Fe3+ and Mn2+ ions, which as the table above shows, only have very pale colours. Therefore, early in the titration the strong purple colour of the manganate ions is quickly lost as soon as the solution reaches the flask with only an extremely pale solution remaining. Depending on the concentrations used the solution in the flask can appear almost colourless.
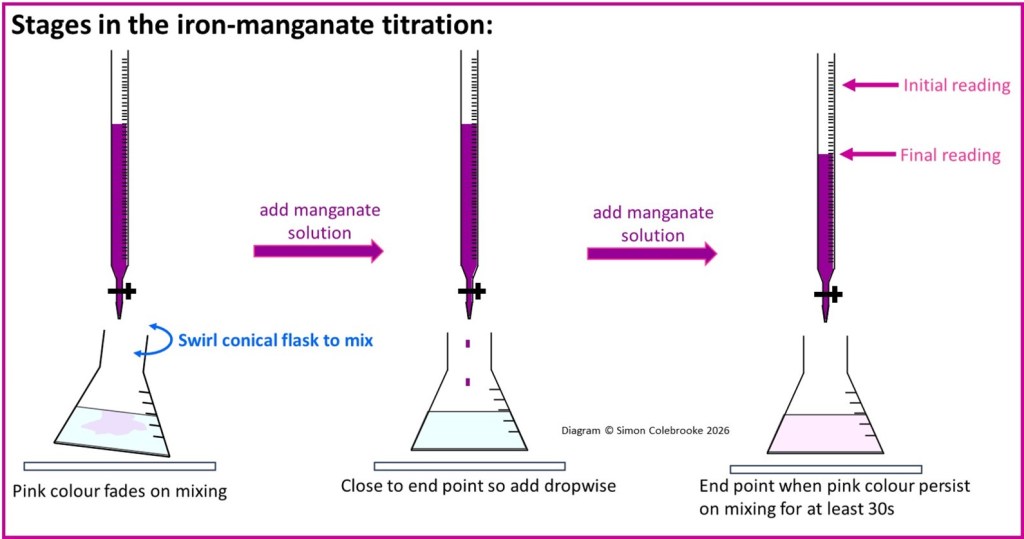
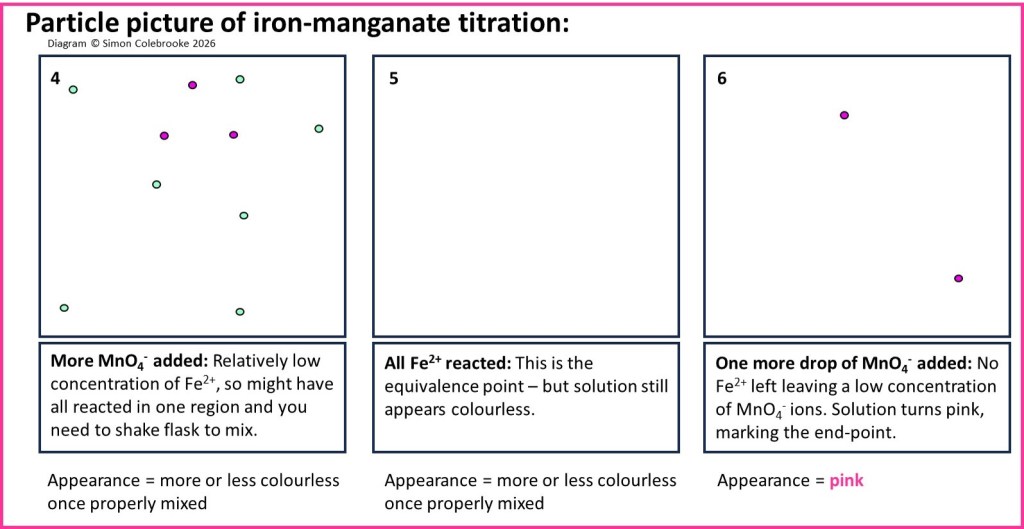
As more and more manganate ions are added to the flask the concentration of Fe2+ ions falls quite low. In the part of the flask where the burette solution first mixes into the bulk solution, the concentration of Fe2+ can become extremely low, so that the colour of the manganate ions persists – swirling the conical flask will cause better mixing so that the colour purple colour fades again, as Fe2+ ions from other regions of the flask encounter the MnO4–. These colour changes are summarised in the series of pictures below:
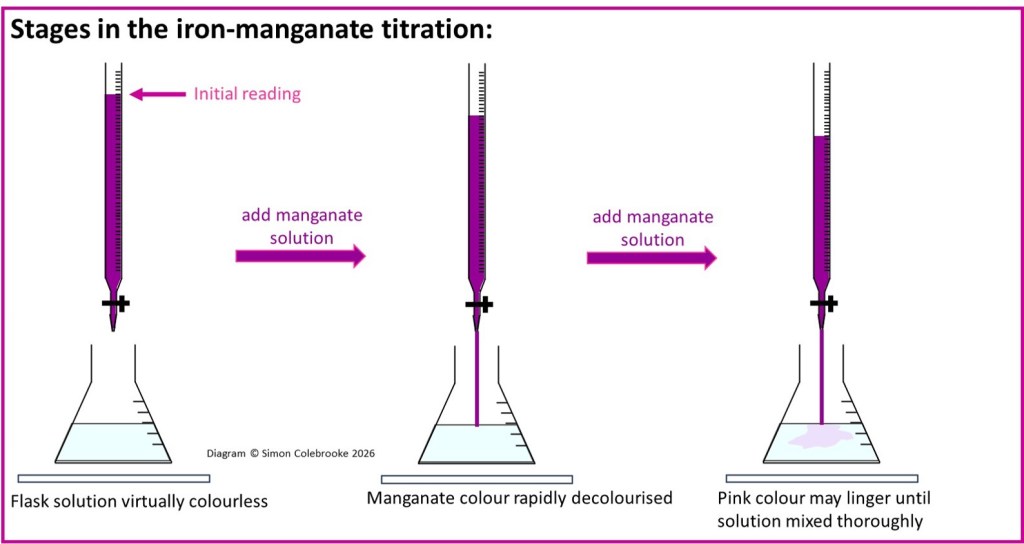
When this slow decolourisation is observed, the manganate should be added dropwise so that the end point can be identified.
As soon as all the Fe2+ ions in the conical flask have reacted any additional manganate added from the burette will have nothing to react with. Hence, these ions remain in the solution. If the titration has been done correctly, only one drop of manganate ions will have been added and so the unreacted MnO4– is significantly diluted by the other contents of the flask. The vivid purple colour is nothing like as intense as it is in the burette, but the ions colour is so strong that the whole solution appears to turn pink. Swirling the flask now will not remove the pink colouration because there are no Fe2+ ions left anywhere in the solution. This is the end-point and the final titre should be measured. The end-point is therefore caused by a slight excess of unreacted manganate ions.
Particle picture of the iron-manganate titration
It might be helpful to try an visualise the end-point of this titration in terms of the individual types of ions present. In the series of pictures below, imagine being able to zoom into a small region of the solution in the conical flask close enough to see separate ions:
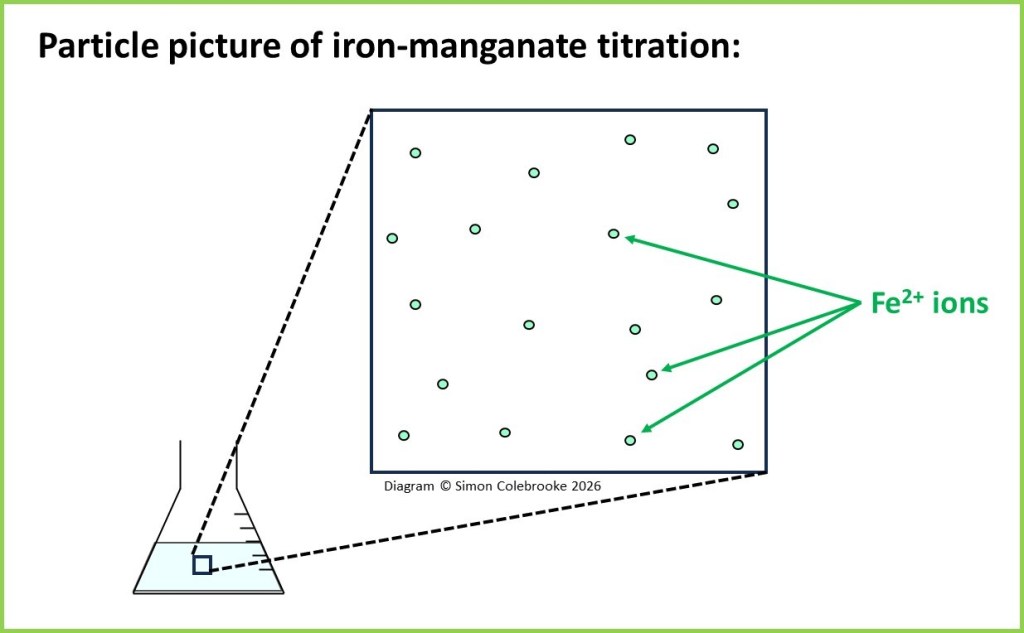
For reasons of clarity the pictures will only show the Fe2+ and MnO4– ions, as it is the relative amounts of these ions that determine the titration end-point. Other ions and the water in the solution are not shown and there is no attempt to reflect the 5:1 stoichiometry either.
Here is how the situation can be visualised at the early stages of the process:
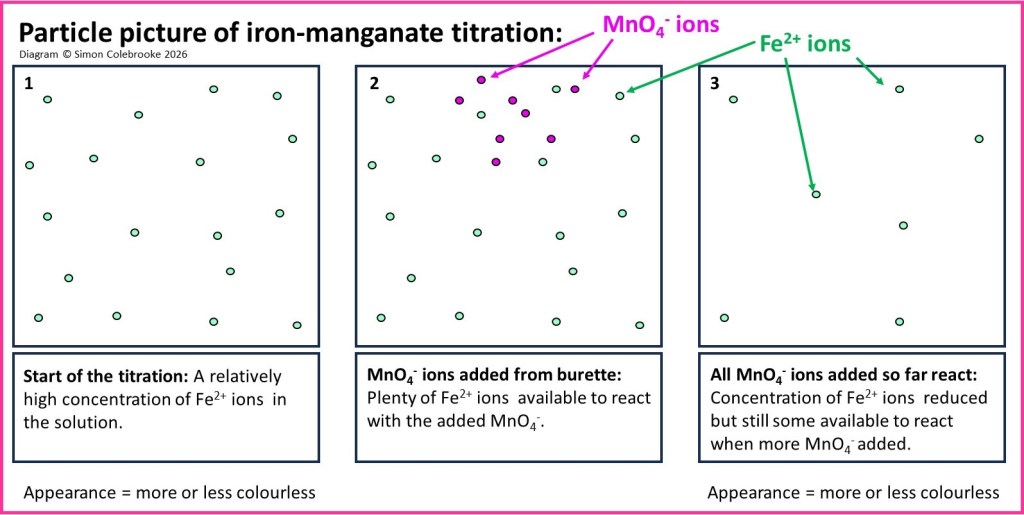
And likewise towards the end-point of the titration:
Calculation:
Finally, once the end-point has been reached it is possible to calculate the amount of Fe2+ ions in the original sample. We essentially work backwards through from step 5 to step 1 in the flow chart, starting with the titre of manganate solution. Although the specific stages in the calculation will depend to some extent on how the solution of the analysed sample was prepared the essential features of the calculation are as follows:
i). Calculate the number of moles of MnO4– ions used in the titration, based on the average titre.
ii). Use the 1:5 stoichiometry in the balanced equation between MnO4– and Fe2+ to calculate the number of moles of Fe2+ in the conical flask for each titration.
iii). Compare the portion of the Fe2+ solution taken in step 2 of the method to the overall volume of solution prepared in step 1 to determine the total amount of Fe2+ ions in the analysed sample. For example, if you had originally prepared 250 cm3 of solution and used 25cm3 of that in a single titration you would have analysed a tenth of the total amount of iron in the sample.
iv). Calculate the mass of iron in the analysed sample.
Now view a page describing a specific example of an iron-manganate titration to see the procedure in practice and ensure you understand how to do the calculation.
Copyright Simon Colebrooke 29th October 2026.



Update history:

