Introduction to titrations
Titrations are a very common technique for analysing the volumes of solutions that react together and they are certainly very prominent in A-level chemistry. There are a number of frequently used titrations with specific purposes – such as acid/base, iron/manganate and iodine/thiosulphate – but before focussing on these specific examples, this section will help you understand how all titrations work.
Although there is a fair amount of variation in terms of what substances are titrated and the specific quantity that is determined, the overall concept is always the same. It involves working out the concentration of a solution, by measuring the volume of a second solution (with known concentration) that is needed to fully react with it. That’s the key idea. Once the concentration of the unknown is found, it can then be used to determine a whole range of things such as a percentage composition or the purity of a substance.
There are two reactant solutions;
1). The “Titrant” – the concentration is known in advance and that is because it has usually been prepared as a standard solution immediately before titration. The titrant solution is typically added to the reaction from a burette and the volume used is measured from the burette scale. The total amount added to the burette in the first place is not measured.
2). The conical flask solution or “Analyte“: Often, this is the solution with unknown concentration and so really this is the object of the titration. A fixed quantity of this solution is transferred to the conical flask before the titration starts, usually via a volumetric pipette as that type of equipment has low percentage uncertainty. Sometimes other substances are added as well (see iodine / thiosulphate titration for example) but that is not usually the subject of the experiment. The analyte solution is normally prepared in a much larger quantity than needed for a single titration and a portion used each time. This allows several titrations to be performed and a mean result to be obtained.
The titration is then set-up as below. More detail descriptions of how to use pipettes and burettes are provided in other sections.
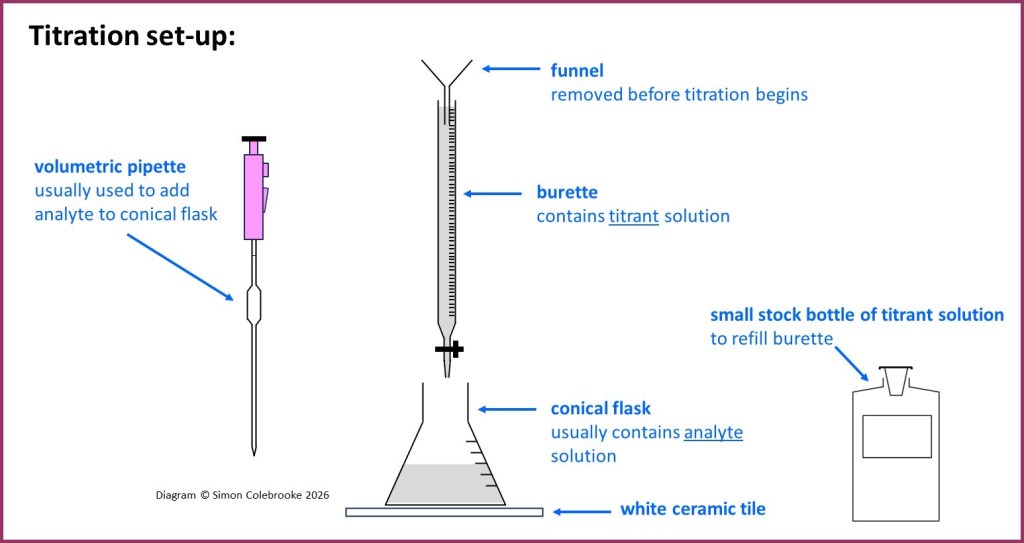
The white tile should always be used as it makes it easier to detect a colour change in the conical flask solution, which is usually how the end-point of the titration is determined.
Although in many cases it is the burette solution / titrant which is a standard solution with concentration known in advance, (and the analyte solution in the flask has unknown concentration), it doesn’t really matter. So long as one of the solutions has known concentration and the volumes which react can be carefully determined, the measurements will enable the concentration of the unknown to be calculated. So for the purpose of this page we will assume the burette solution has known concentration, but watch out – that may not always be the case!
Titration strategy
The strategy is to determine exactly what volume of the burette solution is needed to completely react with a measured volume of the analyte. To achieve this, the burette solution is slowly added to the conical flask, reacting with the analyte as the solutions mix. This continues until it can be determined that the reaction has finished because all the analyte has reacted. The intention is to stop the reaction as close to the point of complete reaction as possible. A mole / stoichiometry calculation is then done to work out the concentration of the
For example, if the titration involved aqueous sulphuric acid (titrant) of known concentration reacting with 25.0 cm3 of sodium hydroxide solution (analyte) the equation for the reaction would be:
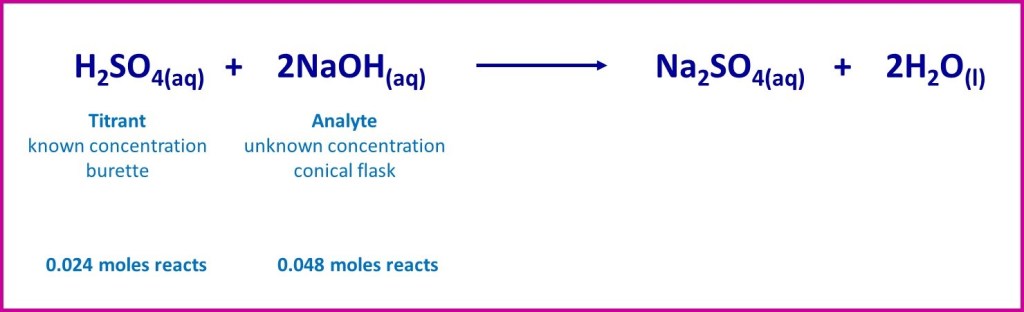
If our measurement of the volume of sulphuric acid allowed us to calculate that 0.024 moles was needed to completely react with the 25.0 cm3 of sodium hydroxide solution, we would know (from the reaction stoichiometry) that the number of moles of sodium hydroxide present had been 2 x 0.024 = 0.048 moles. Knowing the volume of sodium hydroxide used, would then enable easy calculation of the solution concentration.
When reaction has occurred in stoichiometric amounts like this – as indicated by the balanced equation- we have reached “equivalence”.
Equivalence versus end-point
We can define two specific stages in the titration:
Equivalence point: when just the right amount of solution has been added from the burette so that the reaction is completed and all the analyte has reacted.
Because we cannot see the individual reactant molecules / ions we cannot directly tell when this has occurred. Hence, an indicator is usually added which changes colour near the equivalence point thus signalling the end of the titration. This is the “end-point”;
End-point: when we decide the titration should finish, because an indicator changes colour.
Ideally the end-point and the equivalence point would be at the same moment – we could then stop the titration when exactly the right amounts of reactant solutions were used. However, in reality there is usually a small difference. We’ll look more at this when we discuss titration curves and how to choose an indicator. It is usually possible to select and indicator which has an end-point extremely close to the equivalence point.
The Titration Procedure
The method below outlines the approach to carrying out a generalised titration. Although specific types of titration might have additional features, the basic procedure is exactly as described here.
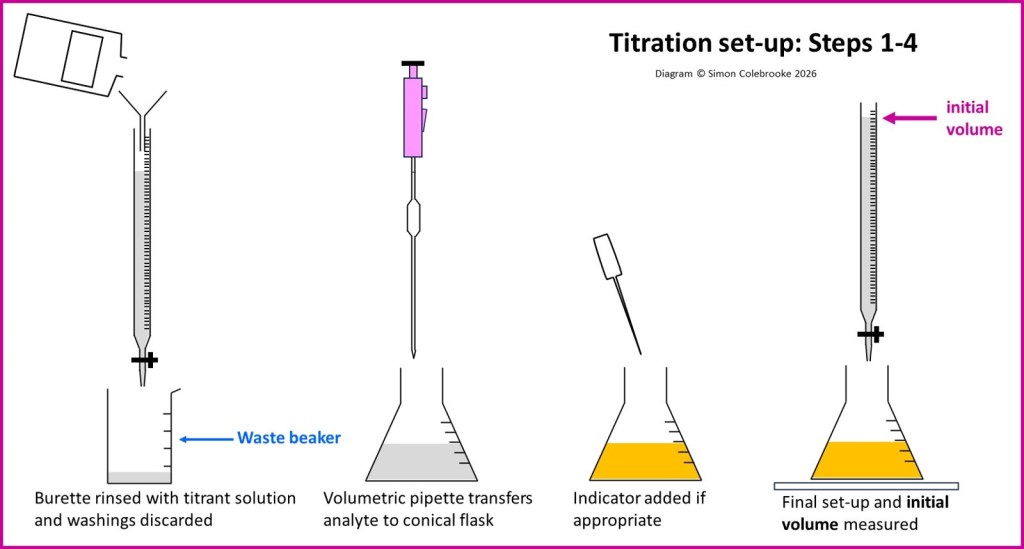
1. Burette is rinsed with the titrant solution to be used and prepared as described in a previous section. Remember to remove the funnel after filling.
2. A volumetric pipette is rinsed with the second reactant solution and then used to transfer a specific quantity into the conical flask.
3. At this stage an indicator is added to the conical flask if needed.
4. The burette scale is used to measure the “initial volume” of titrant solution before the titration is started, to nearest 0.05 cm3.
The “Rough” Titration
At this point, we have no idea how much titrant solution will be used, so the first “Rough” titration is done fairly quickly to identify approximately what volume is needed. The process can then be repeated numerous times more precisely.
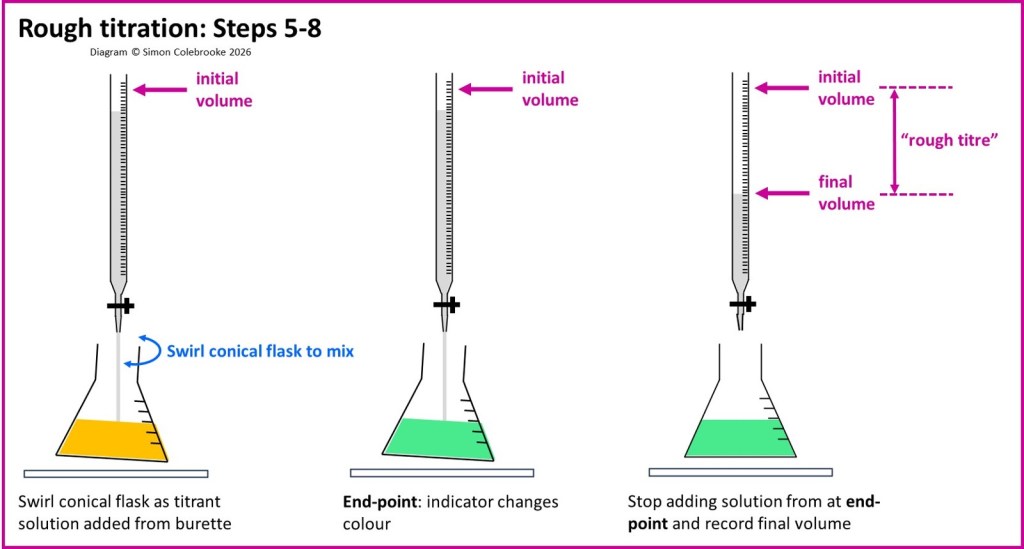
5. The burette tap adjusted so that solution begins to enter the conical flask. You can control the burette tap with one hand (ideally your non-dominant hand) and use your other hand to swirl the conical flask, ensuring the solutions mix.
WHY?
The reaction between the ions in the titrant and analyte solutions will be almost immediate when well mixed. However, the solutions may well have different densities and a thin stream of titrant from the burette will not mix well with the flask solution unless the flask is constantly moved. Instead of physically swirling the flask yourself a magnetic stirrer could be used.
6. Continue adding burette solution until the endpoint is detected (e.g. when an indicator changes colour) and then immediately close the burette tap.
7. Read the burette scale to measure the “final” volume of solution.
8. Calculate the total volume of solution added from the burette – called the “titre” – by finding the difference between final and initial burette measurements. Since this is a rough titration, we call this the “rough titre” and probably won’t use it in a calculation, but it is needed for the accurate titrations.
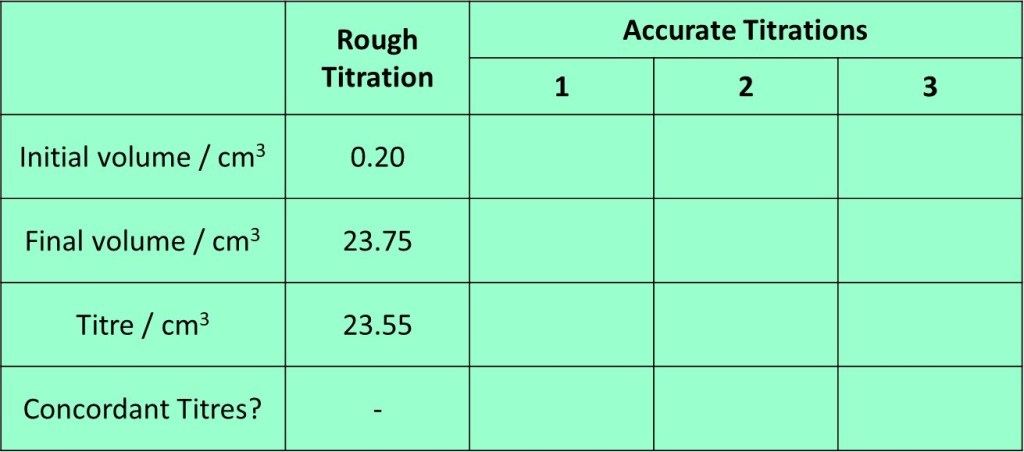
A suitable results table is shown below, along with an example of the type of results you might obtain for a rough titration:
The “Accurate” Titrations
9. Discard the contents of the conical flask and rinse it thoroughly with distilled water.
10. Set up for another titration, using the volumetric pipette to transfer the same volume of analyte solution to the conical flask and refilling the burette if necessary, so there is definitely enough solution for another titration.
11. Record a new “initial” burette reading.
Now that we have a rough titre, we know what to expect. e.g, if the rough titre was 23.55 cm3, we know an accurate titration will be around the same size (and probably a bit less as the chances are we over-shot the end-point when doing it quickly). Hence adding the rough titre to the current initial burette reading gives an indication of where the end-point will be.
12. Adjust the burette tap as before so that solution enters the conical flask and swirl continuously. As we now know roughly what the titre will be, the burette solution can be added quite quickly, until 2-3 cm3 less than the rough titre has been added – this will not lead to over-shooting the end-point.
In the example here, the average titre was 23.55 cm3, so if the initial volume was 0.40 cm3 we expect the end-point to be when the burette measurement is (0.40 + 23.55 = 23.95 cm3). Hence, we can add solution quickly to about 21.50 cm3 on the burette scale and then titrate more slowly or “dropwise” until the end-point is reached.
13. Close the burette tap.
14. Rinse the inside of the conical flask with distilled water, so that any splashes (containing either reactant), are rinsed into bulk solution. Swirl to mix thoroughly.
WHY?
If some material for either of the solutions is unreacted, the end-point will be further from the equivalence point. If there is unreacted titrant we will add more solution from the burette than required and obtain a titre which is too large. Vice-versa if there is unreacted analyte. However, we will be unable to tell whether either of these (or a mixture of both) occurs.
15. Adjust the burette tap so that solution enters the conical flask one drop at a time, with ideally about 1 second between drops. Keep swirling the conical flask.
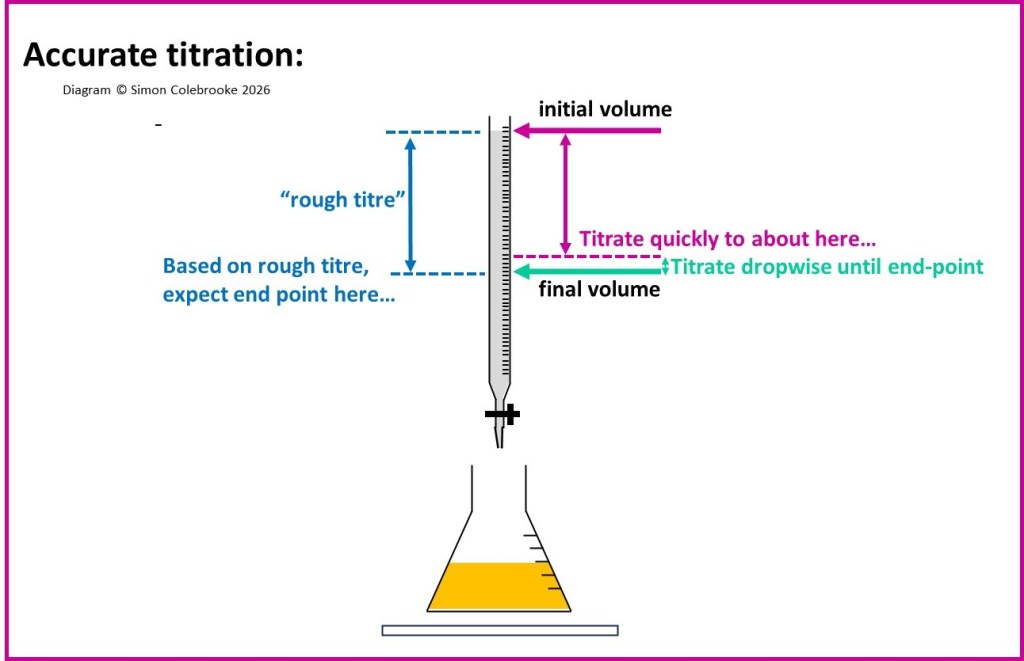
This is illustrated in the diagram below; add the burette solution quickly along the purple arrow, before adding it dropwise along the green arrow. there is no need to record when we start titrating dropwise, only the final volume is required.
16. As soon as end-point is observed, close the burette tap, between drops (which is why a 1 second interval was needed).
17. Measure the “final” volume on burette scale.
18. Calculate the titre for this first accurate titration
19. Empty the conical flask and rinse with distilled water.
WHY?
It is necessary to repeat the accurate titration to obtain a mean value, so there must be no traces of either reactant solution remaining to interfere with the next titration.
20. Repeat the procedure in steps 10-19 to perform more accurate titrations until “concordant titres” are obtained, which are titres within 0.10 cm3 of one another.
WHY?
It is quite challenging to carry out the titration procedure in a reproducible way, especially when starting out in practical chemistry. You may well find your first few titrations on a particular method vary somewhat. Repeating the titration until you achieve consistency is a good way of demonstrating the result is reliable.
21. Find the average (mean) value of the concordant titres, which you then use in a calculation that follows. The exact calculation will obviously depend on the specific experiment carried out – some examples are shown in following sections. Exemplar titration results – and those which are concordant are shown in the table below.
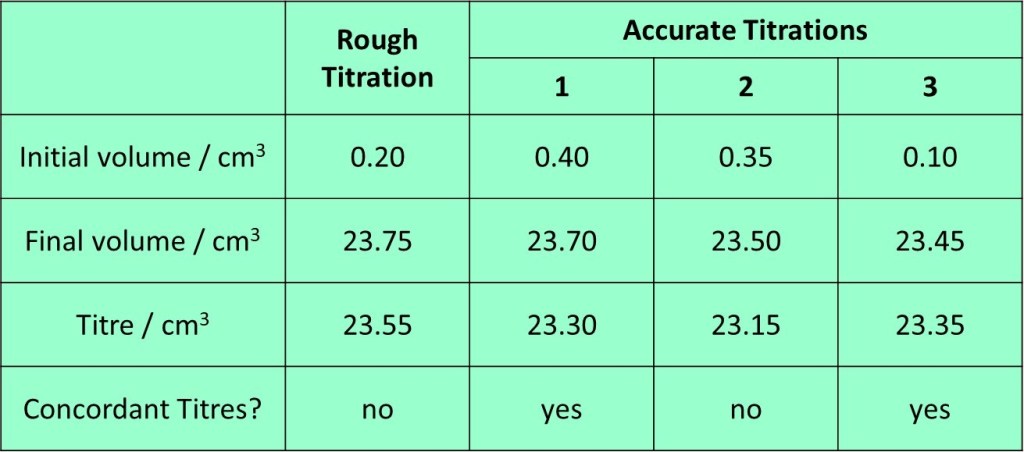
In the results above, the rough titre can be ignored for determining the mean titre as we know if wasn’t performed with the same level of precision as the accurate titrations. From the three accurate titrations, numbers 1 and 3 are within 0.10 cm3 of each other and so are “concordant”. Titration 2 is not within
0.10 cm3 of either of the others and so should be ignored. Thus, we will average titrations 1 and 3 to obtained 23.33 cm3 as a mean titre.
The size of a titre
The titre can in theory be any value. Usually however, quantities and concentrations of solution used are adjusted so that titre are around 25.00 cm3. This gives a fairly low percentage uncertainty in the titre (0.4% if titre is exactly 25.00 cm3) and so usually doesn’t adversely affect the final outcome of the whole titration calculation. If a titration method is followed that results in a titre of much less than 25.00 cm3, then the concentration of the titrant solution can be reduced, thus increasing the titre. Alternatively, if the titre was too large, perhaps getting close to 50 cm3 with the risk that all the burette solution was used before the endpoint (and then requiring a complex process to refill the burette mid-titration) then a lower volume of analyte could be used, reducing the titre again.
Conclusion and Advice
This section has described the fundamental parts of a titration, which should feature in any titration experiment. It is therefore worth learning and understanding this basic method and the principles of how it works. When trying to apply this process to a specific titration, it is important to concentrate primarily on identifying the titrant and analyte solutions, as their interaction is the basis of the whole method. Once you are clear about how they interact you can think about the other feature of a particular method. Quite often the other stages in a longer method are about ensuring that the titration uses sensible quantities of solution and ends up producing a titre in the region of 25.00 cm3. Subsequent sections will described some common types of titration, where all the above principles can be seen.
“Copyright Simon Colebrooke 1st March 2026″
